Here at the Robot Invader compound we are hard at work on our new game, a VR murder mystery title called Dead Secret. There’s a very early trailer to see over at deadsecret.com.
Dead Secret is designed for VR devices, particularly mobile VR devices like the Gear VR. But developing for VR on mobile hardware can be a performance challenge. All the tricks in my last post apply, but the threshold for error is much lower. Not only must you render the frame twice (once for each eye), but any dip below 60 fps can be felt by the player (and it doesn’t feel good). Maintaining a solid frame rate is an absolute must for mobile VR.
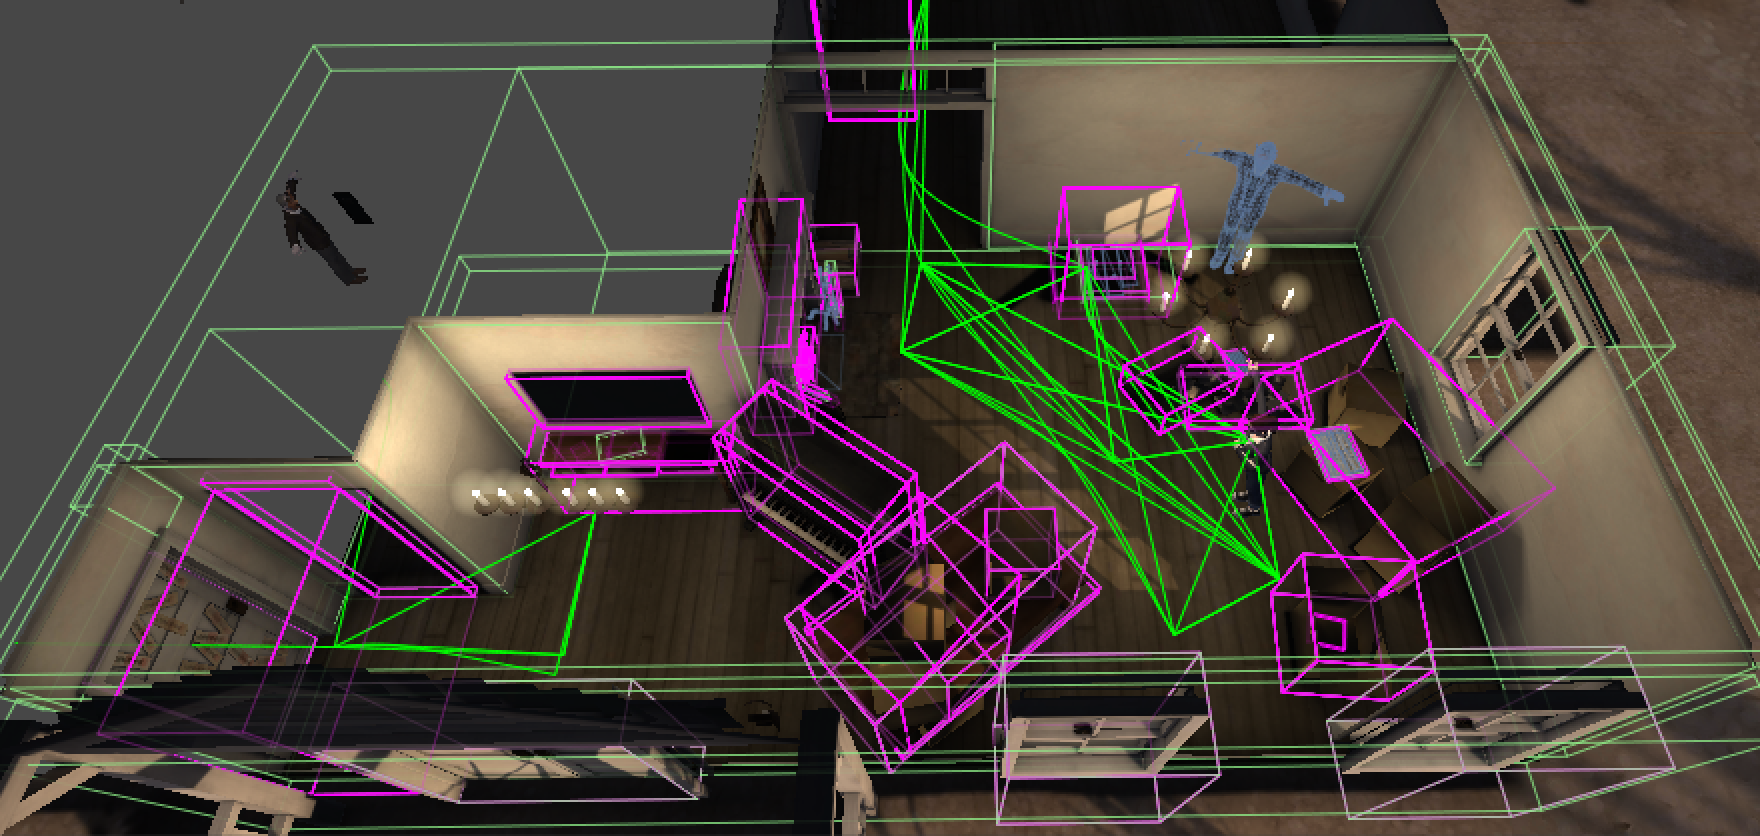
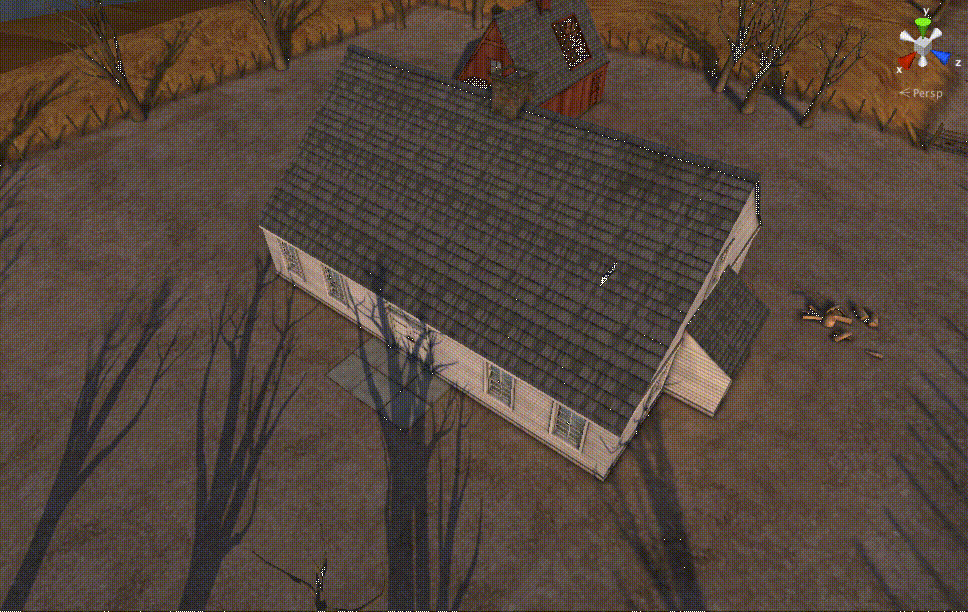
For Dead Secret, one of the major time costs is draw calls. The game takes place in the rural home of a recently-deceased recluse, and the map is a tight organization of rooms. If we were to simply place the camera in a room and render normally, the number of objects that would fall within the frustum would be massive. Though most would be invisible (z-tested away behind walls and doors), these objects would still account for a huge number of extraneous (and quite expensive) draw calls. In fact, even though we have not finished populating all of the rooms with items, furniture, and puzzles, a normal render of the house with just culling requires about 1400 draw calls per frame (well, actually, that’s per eye, so more like 2800 per frame).
The thing is, you can only ever see a tiny fraction of those objects at once. When you are in a room and the doors are closed, you can only see the contents of that room, which usually accounts for about 60 draw calls. What we need is a way to turn everything you can’t see off, and leave the things around you that you might see turned on. That is, we want to cull away all of the occluded objects before they are submitted to render. This is often called occlusion culling.
There are many approaches to solving this problem, but most of them fall within the definition of a Potential Visibility Set system. A PVS system is a system that knows what you can probably see from any given point in the game, a system that knows the “potentially visible” set of meshes for every possible camera position. With a PVS system, we should know the exact set of geometry that you might see, and thus must be considered for render, at any given time. Everything else can just be turned off.
A rudimentary form of PVS is a Portal System, where you define areas that are connected by passages (“portals”). When the camera is in one area, you can assume that only that area and the immediately connected areas are potentially visible. Portals can further be opened and closed, giving you more information about which meshes in your game world are possible to see from your current vantage point.
More complex PVS systems typically cut the world up into segments or regions and then compute the visible set of geometry from each region. As the camera passes from region to region, some meshes are activated while others are turned off. As long as you know where your camera is going to be, you can compute a (sometimes very large) data structure defining the potentially visible set of geometry from any point in that space.
The good news is, Unity comes with a pretty high-end PVS system built right in. It’s based on a third-party tool called Umbra, which by all accounts is a state-of-the-art PVS system (actually, it’s a collection of PVS systems for different use cases). If you need occlusion culling in your game, this is where you should start.
The bad news is, the interface that Unity exposes to the Umbra tool is fairly cryptic and the results are difficult to control. It works really well for the simple scenes referenced by the documentation, but it’s pretty hard to customize specifically for the use-case needed by your game. At least, that’s been my experience.
Dead Secret has a very simple visibility problem to solve. The house is divided into rooms with doors that close, so at a high level we can just consider it a portal system. In fact, if all we needed was portals there are some pretty solid-looking tools available on the Asset Store. Within each room, however, we know exactly where the camera can be, and we’d like to do proper occlusion culling from each vantage point to maximize our draw call savings. If we’re going to go from 1400 draw calls a frame down to 50 or 60, we’re going to have to only draw the things that you can actually see.
My first attempt at a visibility system for Dead Secret was just a component with a list of meshes. I hand-authored the list for every room and used an algorithm with simple rules:
- When standing in a room, enable only the mesh objects in that room’s visibility set.
- When you move to a new room, disable the old room’s visibility set and enable the new room’s visibility set.
- While in transit from one room to another, enable both the visibility set of the old room and the new room.
This works fine, and immediately dropped my draw call count by 98%. But it’s also exceptionally limited: there’s no occlusion culling from different vantage points within the rooms themselves, and the lists have to be manually maintained. It’s basically just a rather limited portal system.
As we started to add more objects to our rooms this system quickly became untenable. The second pass, then, was to compute the list of visible geometry automatically from several vantage points within each room, and apply the same algorithm not just between rooms, but between vantage points within rooms as well. Just as I was thinking about this Matt Rix posted code to access an internal editor-only ray-mesh intersection test function (why isn’t this public API!?), and I jumped on it. By casting rays out in a sphere from each vantage point, I figured I could probably collect a pretty reasonable set of visible geometry.
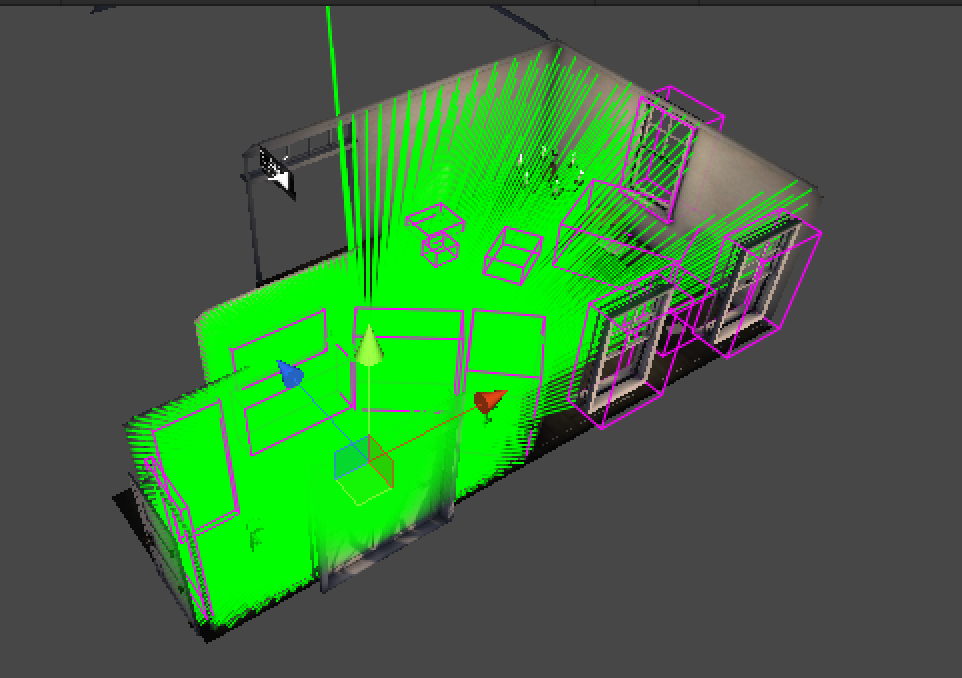
Shoot a bunch of rays, find a bunch of mesh, what could go wrong?
Turns out that while this method works, it has some problems. First, as you might have predicted, it misses small, thin objects that are somewhat far from the camera point. Even with 26,000 rays (five degree increments, plus a little bit of error to offset between sphere scan lines), the rays diverge enough at their extent that small objects can easily be missed. In addition, this method takes a long time to run through the combinatorial explosion of vantage points and mesh objects–about seven hours in our case. It could surely be optimized, but what’s the point if it doesn’t work very well?
For my third attempt, I decided to try a method a co-worker of mine came up with ages ago. Way back in 2006 Alan Kimball, who I worked with at Vicarious Visions, presented a visibility algorithm at GDC based on rendering a scene by coloring each mesh a unique color. If I remember correctly, Alan’s goal was to implement a pixel-perfect mouse picking algorithm. He rendered the scene out to a texture using a special shader that colored each mesh a unique solid color, then just sampled the color under the mouse pointer to determine which mesh had been clicked on. Pretty slick, and quite similar to my current problem.
To turn this approach into a visibility system I implemented a simple panoramic renderer. To render a panorama, I just instantiate a bunch of cameras, rotate them to form a circle, and adjust their viewport rectangles to form a series of slices. Then I render all that into a texture. For the purposes of a visibility system it doesn’t actually matter if the panorama looks good or not, but actually they look pretty nice.
The second bit is to change all of the materials on all of the mesh to something that can render a solid color, and then assign colors to each based on some unique value. The only trickiness here is that the color value must be unique per mesh, and I ended up setting a shader keyword on every material in the game, which meant that I couldn’t really leverage Unity’s replacement shader system. This also means that and I must manually clean the materials up when I’m done, and be careful to assign each back to sharedMaterial so that I don’t break dynamic batching. Unity assumes I don’t know what I am doing and throws a load of warnings about leaking materials (which, of course, there are none). But it works!
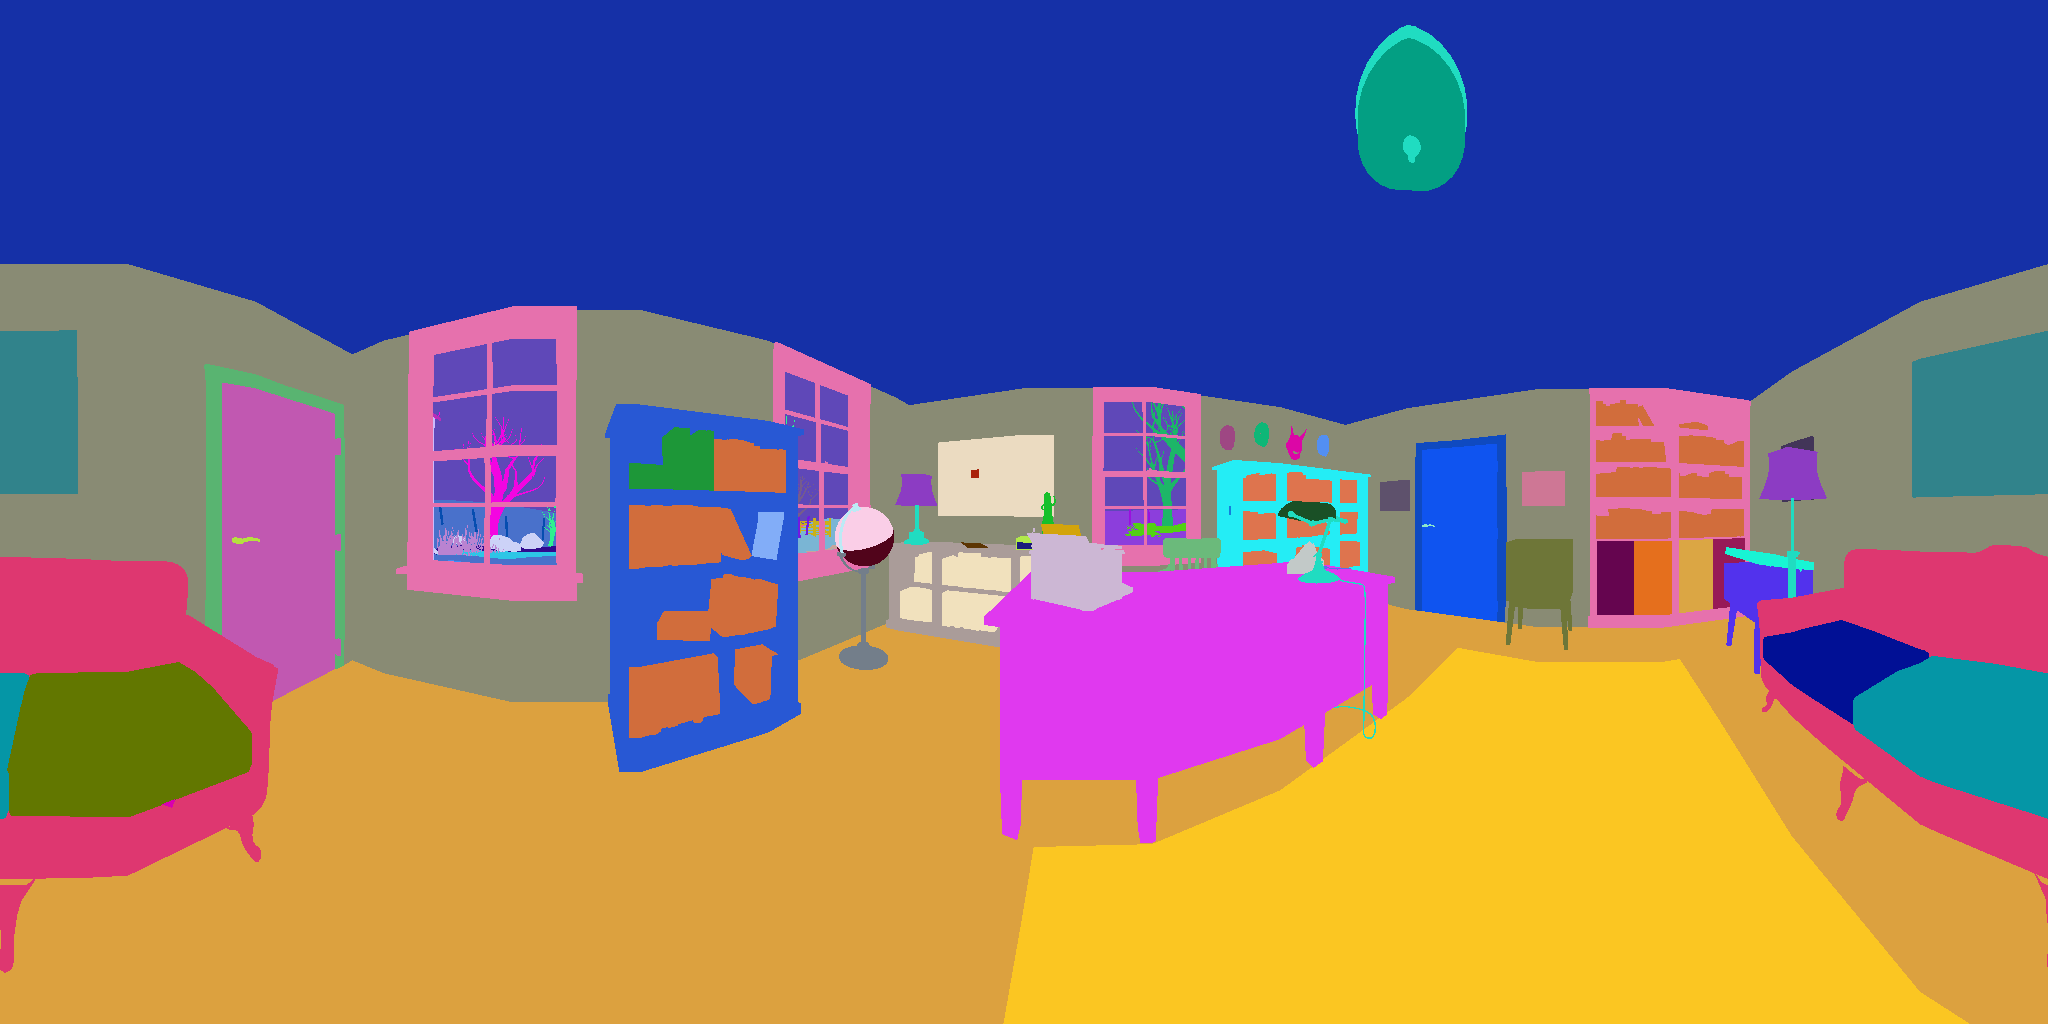
I would actually play a game that looked like this.
Once the colorized panorama is rendered to a texture (carefully created with antialiasing and all other blending turned off), it’s a simple matter to walk the pixels and look each new color up in a table of colors-to-mesh. The system is so precise that it will catch mesh peaking through polygon cracks, so I ended up adding a small pixel threshold (say, ten pixels of the same color) before a mesh can be considered visible.
The output of this function is a highly accurate list of visible geometry that I can plug into the mesh list algorithm described above. In addition, it runs about 60x faster than the ray cast method (yep, seven minutes instead of seven hours for a complete world compute) before any optimizations.
What I’ve ended up with is an exceptionally simple (at runtime), exceptionally accurate visibility system. Its main weakness is that it only computes from specific vantage points, but the design of Dead Secret makes that a non-issue. It doesn’t handle transparent surfaces well (it sees them as opaque occluders), but that’s not an issue for me either.
The result is that Dead Secret is running at a solid 60 fps on the Gear VR hardware. We have enough headroom to experiment with expensive shaders that we should probably avoid, like mirrors (the better to lurk behind you, my dear). This performance profile gives us space to stock the house with details, clues, a dead body or two, and maybe even a psycho killer. Ah, but, I mustn’t spoil it for you. I’ve already said too much. Just, uh, keep your eyes peeled for Dead Secret in 2015.